2022 Summer Challenge
June 1 - Aug 31
STEM All Summer Long!
Welcome to GIGIL's STEM Summer Challenge!
We've rounded up some fun STEM activities to keep your Jr. Scientists learning, playing, and being creative throughout the summer. To participate, follow the instructions for each activity below.
Once completed, upload a photo or video using the form attached to each activity.
On September 1st, we'll determine the winners for each category and notify you via email.
We can't wait to see your creations!
Most Creative
.png)
Time to break out your paints, markers, and crayons.
Complete each activity in a creative way to win this Elite STEM Kit!
.png)
Rack up the most points to win a 2 month STEM subscription and receive 20% off your next purchase!
Completed Activity
10 points each
Follow Us On Social Media
5 points each
Subscribe To Our Newsletter
5 points
Post A Picture and Tag Us on IG
5 points for each photo
*By submitting photos you are allowing GIGIL STEM Kits to post on social media
Most Innovative
.png)
Missing some of the supplies you need? Or maybe you have a better idea of how to complete the activity?
Use your problem-solving skills to think outside the box to complete each activity! Use the instructions as guidance, but put your best ideas to work!
Most Points
Jump to the Activities
Science
Make An
Egg Bounce
Materials
-
1 Egg
-
Glass Cup
-
White Vinegar
Instructions
-
Before you start - make a guess on what your egg will look like after 2 days of soaking in vinegar! Why do you think it will look this way?
-
Fill your glass with enough white vinegar to cover your egg.
-
Put your egg in the glass and wait for 2 full days!
-
Pull your egg out and notice the way it feels. Why does it feel that way?
Take Note
-
After the first hour, take note of what your egg looks like. What's happening with the vinegar and the egg?
-
After the first 6 hours, what is the vinegar and egg looking like?
-
What does it look like after a full day?
-
Finally, what is the end result?
How To Separate Salt & Pepper
Materials
-
Table Salt
-
Pepper
-
Plate
-
Comb
-
Optional - inflated balloon or wool
Instructions
-
Sprinkle a good amount of salt and pepper to a plate. Mix together.
-
Charge your comb with static electricity by running it through your hair, by rubbing it against a balloon, or rubbing it on a piece of wool.
-
Slowly move your comb across the pile of salt and pepper. Watch your pepper lift from the salt and onto your comb!
Take Note
-
What happens when you charge the comb and hand it off to another person? Does this experiment still work?
-
Why do you think the pepper is separating from the salt?
Technology
Coded Clues
Materials
-
Print the downloadable sheets shown above
Instructions
-
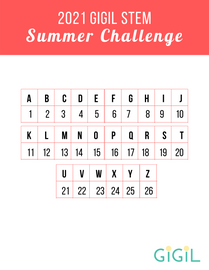
Use the guide to decipher each of the tech fact sentences!
-
Each number represents a letter.
Code A Map
Materials
-
Print the downloadable sheets shown above or create your own placeholders and squares!
Instructions
-
We're going to create a map and code directions through your house! First, determine a start point, an endpoint, and 2 detours along the way. Place a marker at each of those locations.
-
Then place squares in a grid system throughout your house making sure to connect each of your initial markers.
-
Now that your grid is in place, write out instructions on how to get from the start point to each detour and then to the ending point! Your instructions should read something like "Move 5 squared forward, Turn right, Move 4 squares forward, etc" to each spot.
-
Follow your directions on your map to see how well you did!
Create A Challenge
-
To make this more challenging, use certain requirements while writing directions. Examples -
-
You can only turn right
-
You have to turn right 3 times and left 4 times
-
-
You can also add in more detours!
Engineering
Build A Hand Crank
Materials
-
2 paper towel rolls
-
1 regular straw
-
1 bendy straw OR wire
-
Cardboard
-
Tape
-
Something as a basket
-
String
Instructions
-
Start by cutting 2 notches at the top of each of your paper towel rolls. This only needs to be wide enough to fit the straw.
-
Tape your rolls to your cardboard base. Make sure the notches are on the top and are lined up with each other and the rolls are straw-width apart. This is where the straw will sit!
-
Put your bendy straw inside the regular straw and tape together. This will be your handle.
-
Determine what your basket will be. We used a piece of an egg carton!
-
Time to cut your string. The string lenght should be long enough to wrap around your basket plus the length of the paper towel rolls plus one inch.
-
After you cut your string, secure your basket.
-
Then secure the other end of your string to the straw.
-
Once everything is secure, place an object in the basket and wind up using your straw handle!
Safely Drop An Egg
Materials
-
Egg
-
Random materials from around the house
About
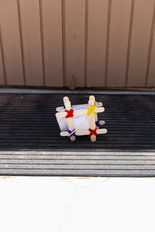
Help your egg land safely! Grab a bunch of materials that you think would help you build a contraption to save the egg from a fall.
Take a look at the first two photos shown above. One of them made a safe landing, the other resulted in a smashed egg! Which one do you think survived the fall and why?
After you build your contraption, have an adult drop it from way up high and drop it!
Take Note
-
What about your contraption makes you think it will land safely?
-
What was the result?
-
How will you build your next one stronger and tougher?
Math
This or That
Materials
-
Hanger
-
String
-
2 cups
-
Scissors
Instructions
-
Cut 4 pieces of string at least 16" in length.
-
Locate the center of 2 strings and twist them as shown above. This is where your cup will sit.
-
Tape the bottom of the cup to this twist so it is secure. Bring the strings up and tape or tie them together.
-
Adhere this to one side of the hanger as shown above. Do the same for the other cup!
-
Put your hanger on a doorknob or hook. Now your scale is ready!
Experiments
-
Have your parent pick one object. Search the house for an object you think weighs the same. Put each item in its own cup on your scale. What are the results?
-
Pick 2 objects on your own. Just by looking at them, make your guess on which weighs more.
-
Now try experimenting with liquids! Fill one of the cups with water. What objects do you think you would need to match the weight of the water?
Square Wheels?!
Materials
-
10+ cylinder-shaped objects of the same size (cans, bottles, etc)
-
Ruler
-
Tape
-
Skewers
-
Cardboard
-
Pencil
-
Scissors
Instructions
-
First, lay out all of your cans or bottles in a row. Secure them by taping them to the table or floor.
-
Measure the diameter of the can.
-
Use this measurement to measure a square as shown above. Create 4 squares of the same size.
-
Use 1 skewer to pierce the center of 2 squares. Use your second skewer for the other two squares. These are the wheels and axles of your car.
-
Next, we're measuring a cardboard rectangle for your car's body. This needs to be long enough that your wheels do not run into each other and just wide enough to fit on your cans or bottles.
-
After measuring this, cut out your cardboard rectangle.
-
Use tape to adhere your wheels to the body.
-
Add tape the outside of your wheels so they don't slide off of your axle.
-
Now that your car is assembled, run it along your track!


